
canvas getContext对象方法和属性详细介绍
1.globalAlpha 属性,设置透明效果
function draw() {
  var ctx = document.getElementById('canvas').getContext('2d');
  // 画矩形
  ctx.fillStyle = '#FD0';
  ctx.fillRect(0,0,75,75);
  ctx.fillStyle = '#6C0';
  ctx.fillRect(75,0,75,75);
  ctx.fillStyle = '#09F)';
  ctx.fillRect(0,75,75,75);
  ctx.fillStyle = '#F30';
  ctx.fillRect(75,75,150,150);
  ctx.fillStyle = '#FFF';
  // 设置透明度 取值范围 0-1
  ctx.globalAlpha = 0.2;
  // 画7个同心圆
  for (i=0;i<7;i++){
      ctx.beginPath();
      ctx.arc(75,75,10+10*i,0,Math.PI*2,true);
      ctx.fill();
  }
}
上例中通过设置了每个圆是透明的,就出现一些效果了
2.textAlign 属性,定义文本位置,值有 left right center,这个位置是某点相对于文字的开始处而言。比如left表示某点在文字开始处的左边,以此类推。
例子如下:
<!DOCTYPE HTML>
<html>
<head>
<script>

function init() {
	var canvas=document.getElementById("myCanvas");
	var context=canvas.getContext("2d");

	var x = 288;
	var y = 110;
	context.font="30pt Calibri";
	context.textAlign="left";
	context.fillStyle="blue";
	context.fillText("Hello World!", x, y);
}

</script>
</head>
<body onload="init()">
	<canvas id="myCanvas" width="578" height="200"></canvas>
</body>
</html>
3.shadowBlur 类似于photoshop里的滤镜功能
<!DOCTYPE html>
<html lang="en">
  <head>
    <meta charset="utf-8">
    <title>canvas shadowBlur</title>
    <script type="text/javascript">
window.addEventListener('load', function () {
  // Get the canvas element.
  var elem = document.getElementById('myCanvas');
  if (!elem || !elem.getContext) {
    return;
  }
  // Get the canvas 2d context.
  var context = elem.getContext('2d');
  if (!context) {
    return;
  }
  // Let's draw a blue rectangle with a red shadow.
  // Shadows only render in Firefox 3.1 nightly builds and in Konqueror 4.1.
  context.shadowOffsetX = 5;
  context.shadowOffsetY = 5;
  context.shadowBlur    = 4;
  context.shadowColor   = 'rgba(255, 0, 0, 0.5)';
  context.fillStyle     = '#00f';
  context.fillRect(20, 20, 150, 100);
}, false);
</script>
  </head>
  <body>
    <p><canvas id="myCanvas" width="300" height="150">Your browser does not have
    support for Canvas.  This should render as:诺基亚5230</canvas></p>
  </body>
</html>
运行效果如下:
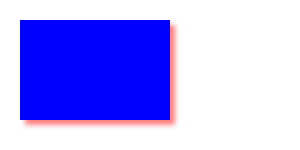
4.shadowColor 设置阴影的颜色,例子如上例中的阴影颜色
5.lineJoin 该属性设置 线条链接的样式,共有三个值:miter,round,bevel ,还是直接看例子吧。
<!DOCTYPE HTML>
<html>
<head>
<style>
	body {
		margin:0px;
		padding:0px;
	}
	#myCanvas {
		border:1px solid #9C9898;
	}
</style>
<script>
function init() {
	var canvas=document.getElementById("myCanvas");
	var context=canvas.getContext("2d");
	context.beginPath();
	context.moveTo(130,25);
	context.lineTo(230,165); // line 1
	context.lineTo(330,25); // line 2
	context.lineTo(430,165); // line 3
	context.lineWidth=25;
	context.lineJoin="miter";
	context.stroke();
}
</script>
</head>
<body onload="init()">
	<canvas id="myCanvas" width="578" height="200"></canvas>
</body>
</html>
修改上例中的 context.lineJoin 的值,就能看出猫腻了。这个例子运行效果图如下:

6.lineWidth 线条宽度:具体可以参考上例中的context.lineWidth=25
7.globalCompositeOperation 该属性表示全局组合操作后的效果,具体值有:
'source-over','source-in','source-out','source-atop',
        'destination-over','destination-in','destination-out','destination-atop',
        'lighter','darker','copy','xor'
具体例子如下:
<html>
<head>
<title>A canvas globalCompositeOperation example</title>
<meta name="DC.creator" content="Kamiel Martinet, http://www.martinet.nl/">
<meta name="DC.publisher" content="Mozilla Developer Center, http://developer.mozilla.org">
<script type="application/x-javascript">
var compositeTypes = [
'source-over','source-in','source-out','source-atop',
'destination-over','destination-in','destination-out','destination-atop',
'lighter','darker','copy','xor'
];
function draw(){
for (i=0;i<compositeTypes.length;i++){
var label = document.createTextNode(compositeTypes[i]);
document.getElementById('lab'+i).appendChild(label);
var ctx = document.getElementById('tut'+i).getContext('2d');
// draw rectangle
ctx.fillStyle = "#09f";
ctx.fillRect(15,15,70,70);
// set composite property
ctx.globalCompositeOperation = compositeTypes[i];
// draw circle
ctx.fillStyle = "#f30";
ctx.beginPath();
ctx.arc(75,75,35,0,Math.PI*2,true);
ctx.fill();
}
}
</script>
<style type="text/css">
body { margin: 20px; font-family: arial,verdana,helvetica; background: #fff;}
h1 { font-size: 140%; font-weight:normal; color: #036; border-bottom: 1px solid #ccc; }
canvas { border: 2px solid #000; margin-bottom: 5px; }
td { padding: 7px; }
pre { float:left; display:block; background=\'#\'" border: 1px dashed #666; padding: 15px 20px; margin: 0 0 10px 0; }
</style>
</head>
<body onload="draw();">
<h1>A canvas <code>globalCompositeOperation</code> example</h1>
<div>
<table>
<tr>
<td><canvas id="tut0" width="125" height="125"></canvas><br/><label id="lab0"></label></td>
<td><canvas id="tut1" width="125" height="125"></canvas><br/><label id="lab1"></label></td>
<td><canvas id="tut2" width="125" height="125"></canvas><br/><label id="lab2"></label></td>
<td><canvas id="tut3" width="125" height="125"></canvas><br/><label id="lab3"></label></td>
</tr>
<tr>
<td><canvas id="tut4" width="125" height="125"></canvas><br/><label id="lab4"></label></td>
<td><canvas id="tut5" width="125" height="125"></canvas><br/><label id="lab5"></label></td>
<td><canvas id="tut6" width="125" height="125"></canvas><br/><label id="lab6"></label></td>
<td><canvas id="tut7" width="125" height="125"></canvas><br/><label id="lab7"></label></td>
</tr>
<tr>
<td><canvas id="tut8" width="125" height="125"></canvas><br/><label id="lab8"></label></td>
<td><canvas id="tut9" width="125" height="125"></canvas><br/><label id="lab9"></label></td>
<td><canvas id="tut10" width="125" height="125"></canvas><br/><label id="lab10"></label></td>
<td><canvas id="tut11" width="125" height="125"></canvas><br/><label id="lab11"></label></td>
</tr>
</table>
<pre>
var compositeTypes = [
'source-over','source-in','source-out','source-atop',
'destination-over','destination-in','destination-out','destination-atop',
'lighter','darker','copy','xor'
];
function draw(){
for (i=0;i<compositeTypes.length;i++){
var label = document.createTextNode(compositeTypes[i]);
document.getElementById('lab'+i).appendChild(label);
var ctx = document.getElementById('tut'+i).getContext('2d');
// draw rectangle
ctx.fillStyle = "#09f";
ctx.fillRect(15,15,70,70);
// set composite property
ctx.globalCompositeOperation = compositeTypes[i];
// draw circle
ctx.fillStyle = "#f30";
ctx.beginPath();
ctx.arc(75,75,35,0,Math.PI*2,true);
ctx.fill();
}
}
</pre>
</div>
</body>
</html>
具体测试效果如下图:

8.shadowOffsetX 参考第三条的 shadowBlur,那个例子中有用到这个shadowOffsetX属性,就是统一个点的水平方向偏移量。比如都是右上角那个点。
9. font 该属性定义了字体,请参考属性2
10.lineCap 该属性定义了线条头部的形状,它的值为:butt,round,square
例子如下
<html>
<head>
<title>A canvas lineCap example</title>
<meta name="DC.creator" content="Kamiel Martinet, http://www.martinet.nl/">
<meta name="DC.publisher" content="Mozilla Developer Center, http://developer.mozilla.org">
<script type="application/x-javascript">
function draw() {
var ctx = document.getElementById('canvas').getContext('2d');
var lineCap = ['butt','round','square'];
// Draw guides
ctx.strokeStyle = '#09f';
ctx.beginPath();
ctx.moveTo(10,10);
ctx.lineTo(140,10);
ctx.moveTo(10,140);
ctx.lineTo(140,140);
ctx.stroke();
// Draw lines
ctx.strokeStyle = 'black';
for (i=0;i<lineCap.length;i++){
ctx.lineWidth = 15;
ctx.lineCap = lineCap[i];
ctx.beginPath();
ctx.moveTo(25+i*50,10);
ctx.lineTo(25+i*50,140);
ctx.stroke();
}
}
</script>
<style type="text/css">
body { margin: 20px; font-family: arial,verdana,helvetica; background: #fff;}
h1 { font-size: 140%; font-weight:normal; color: #036; border-bottom: 1px solid #ccc; }
canvas { float: left; margin-right: 20px; margin-bottom: 20px; }
pre { float:left; display:block; background=\'#\'" border: 1px dashed #666; padding: 15px 20px; margin: 0 0 10px 0; }
</style>
</head>
<body <h1>A canvas <code>lineCap</code> example</h1>
<div>
<canvas id="canvas" width="150" height="150"></canvas>
<pre>
function draw() {
var ctx = document.getElementById('canvas').getContext('2d');
var lineCap = ['butt','round','square'];
// Draw guides
ctx.strokeStyle = '#09f';
ctx.beginPath();
ctx.moveTo(10,10);
ctx.lineTo(140,10);
ctx.moveTo(10,140);
ctx.lineTo(140,140);
ctx.stroke();
// Draw lines
ctx.strokeStyle = 'black';
for (i=0;i<lineCap.length;i++){
ctx.lineWidth = 15;
ctx.lineCap = lineCap[i];
ctx.beginPath();
ctx.moveTo(25+i*50,10);
ctx.lineTo(25+i*50,140);
ctx.stroke();
}
}
</pre>
</div>
</body>
</html>
运行效果图如下:

11.miterLimit 该属性定义了斜连线长度和线条宽度的最大比率,这个属性只有当lineJoin='miter' 时才有效。
例子如下:
<html>
  <head>
    <title>A canvas miterLimit example</title>
    <meta name="DC.creator" content="Kamiel Martinet, http://www.martinet.nl/">
    <meta name="DC.publisher" content="Mozilla Developer Center, http://developer.mozilla.org">
    <script type="application/x-javascript">
      function draw() {
        var ctx = document.getElementById('canvas').getContext('2d');

        // Clear canvas
        ctx.clearRect(0,0,150,150);

        // Draw guides
        ctx.strokeStyle = '#09f';
        ctx.lineWidth   = 2;
        ctx.strokeRect(-5,50,160,50);

        // Set line styles
        ctx.strokeStyle = '#000';
        ctx.lineWidth = 10;

        // check input
        if (document.getElementById('miterLimit').value.match(/\d+(\.\d+)?/)) {
          ctx.miterLimit = parseFloat(document.getElementById('miterLimit').value);
        } else {
          alert('Value must be a positive number');
        }

        // Draw lines
        ctx.beginPath();
        ctx.moveTo(0,100);
        for (i=0;i<24;i++){
          var dy = i%2==0 ? 25 : -25 ;
          ctx.lineTo(Math.pow(i,1.5)*2,75+dy);
		  //if(i==10)break;
        }
        ctx.stroke();
        return false;
      }
      function init(){
        document.getElementById('miterLimit').value =
          document.getElementById('canvas').getContext('2d').miterLimit;
        draw();
      }
    </script>
    <style type="text/css">
      body { margin: 20px; font-family: arial,verdana,helvetica; background: #fff;}
      h1 { font-size: 140%; font-weight:normal; color: #036; border-bottom: 1px solid #ccc; }
      canvas { border: 2px solid #000; float: left; margin-right: 20px; margin-bottom: 20px; }
      pre { float:left; display:block; background=\'#\'"  border: 1px dashed #666; padding: 15px 20px; margin: 0 0 10px 0; }
      td { vertical-align:top; }
    </style>
  </head>
  <body     <h1>A canvas <code>miterLimit</code> example</h1>
    <table>
      <tr>
        <td><canvas id="canvas" width="150" height="150"></canvas></td>
        <td>
          Change the miterLimit by entering a new value below and clicking the
          redraw button.<br><br>
          <form onsubmit="return draw();">
            <label>Miter limit</label>
            <input type="text" size="3" id="miterLimit"/>
            <input type="submit" value="Redraw"/>
          </form>
        </td>
      </tr>
    </table>
  </body>
</html>
运行效果图如下:

像什么?心电图了。。。
12.shadowOffsetY 同 上面的shadowOffsetX
13.textBaseline 文字竖直对齐方式。可取属性值:top, hanging, middle,
alphabetic, ideographic, bottom。默认值:alphabetic.例子如下:
context.fillStyle    = '#00f';
context.font         = 'italic 30px sans-serif';
context.textBaseline = 'top';
context.fillText  ('www.2345hk.com!', 0, 0);
context.font         = 'bold 30px sans-serif';
context.strokeStyle = '#00f';
context.strokeText('www.2345hk.com!', 0, 24);
14.strokeStyle 该属性定义对于边框的修饰,它和fillStyle的作用一样,只不过 fillStyle是对内容的填充。例子如上第十三条中的。

15.fillStyle 参考 第十四条
16.canvas 该属性可以绘制于其上的 Canvas 元素
17.rect 该方法为当前路径添加一条矩形子路径。引用方式:
function rect(x, y, width, height)
其中x,y 为矩形的左上角坐标,width 和height分别是矩形的长宽
18.lineTo 该方法能够画直线,调用方式:
lineTo(x, y)
其中参数x,y为直线终点的坐标,起点是当前点。执行完这个函数,当前点为x,y
19.rotate 方法旋转画布的坐标系统。调用方式如下:
rotate(angle)
其中angle为旋转的弧度,正值表示顺时针方向旋转,负值表示逆时针方向旋转。
例子如下:
<html>
<head>
<title>A canvas rotate example</title>
<meta name="DC.creator" content="Kamiel Martinet, http://www.martinet.nl/">
<meta name="DC.publisher" content="Mozilla Developer Center, http://developer.mozilla.org">
<script type="application/x-javascript">
function draw() {
var ctx = document.getElementById('canvas').getContext('2d');
ctx.translate(100,100);
for (i=1;i<6;i++){
ctx.save();
ctx.fillStyle = 'rgb(255,'+Math.abs(306-51*i)+',0)';
for (j=0;j<i*6;j++){
ctx.rotate(Math.PI*2/(i*6));
ctx.beginPath();
ctx.arc(0,i*12.5,5,0,Math.PI*2,true);
ctx.fill();
}
ctx.restore();
}
}
</script>
<style type="text/css">
body { margin: 20px; font-family: arial,verdana,helvetica; background: #fff;}
h1 { font-size: 140%; font-weight:normal; color: #036; border-bottom: 1px solid #ccc; }
canvas { border: 2px solid #000; float: left; margin-right: 20px; margin-bottom: 20px; }
pre { float:left; display:block; background=\'#\'" border: 1px dashed #666; padding: 15px 20px; margin: 0 0 10px 0; }
</style>
</head>
<body <h1>A canvas <code>rotate</code> example</h1>
<div>
<canvas id="canvas" width="200" height="200"></canvas>
<pre>
function draw() {
var ctx = document.getElementById('canvas').getContext('2d');
ctx.translate(100,100);
for (i=1;i<6;i++){
ctx.save();
ctx.fillStyle = 'rgb(255,'+Math.abs(306-51*i)+',0)';
for (j=0;j<i*6;j++){
ctx.rotate(Math.PI*2/(i*6));
ctx.beginPath();
ctx.arc(0,i*12.5,5,0,Math.PI*2,true);
ctx.fill();
}
ctx.restore();
}
}
</pre>
</div>
</body>
</html>
运行效果如下:

20.setMiterLimit 设置斜接限制,具体资料没有找到,有知道的朋友可以补充下。
21.quadraticCurveTo 为当前路径添加一条贝塞尔曲线,引用方式如下:
quadraticCurveTo(cpX, cpY, x, y)
其中x,y 为终点坐标,起点坐标为当前点,cpX,cpY为控制点,控制曲线的形状,举例如下:
<html>
  <head>
    <title>A canvas quadraticCurveTo example</title>
    <meta name="DC.creator" content="Kamiel Martinet, http://www.martinet.nl/">
    <meta name="DC.publisher" content="Mozilla Developer Center, http://developer.mozilla.org">
    <script type="text/javascript">
      function drawShape(){
        // get the canvas element using the DOM
        var canvas = document.getElementById('tutorial');
        // Make sure we don't execute when canvas isn't supported
        if (canvas.getContext){
          // use getContext to use the canvas for drawing
          var ctx = canvas.getContext('2d');
          // Draw shapes
          ctx.beginPath();
          ctx.moveTo(75,25);
          ctx.quadraticCurveTo(25,25,25,62.5);
          ctx.quadraticCurveTo(25,100,50,100);
          ctx.quadraticCurveTo(50,120,30,125);
          ctx.quadraticCurveTo(60,120,65,100);
          ctx.quadraticCurveTo(125,100,125,62.5);
          ctx.quadraticCurveTo(125,25,75,25);
          ctx.stroke();
        } else {
          alert('You need Safari or Firefox 1.5+ to see this demo.');
        }
      }
    </script>
    <style type="text/css">
      body { margin: 20px; font-family: arial,verdana,helvetica; background: #fff;}
      h1 { font-size: 140%; font-weight:normal; color: #036; border-bottom: 1px solid #ccc; }
      canvas { border: 2px solid #000; float: left; margin-right: 20px; margin-bottom: 20px; }
      pre { float:left; display:block; background=\'#\'"  border: 1px dashed #666; padding: 15px 20px; margin: 0 0 10px 0; }
    </style>
  </head>
  <body     <h1>A canvas <code>quadraticCurveTo</code> example</h1>
    <div>
      <canvas id="tutorial" width="150" height="150"></canvas>
      <pre>
function drawShape(){
  // get the canvas element using the DOM
  var canvas = document.getElementById('tutorial');
  // Make sure we don't execute when canvas isn't supported
  if (canvas.getContext){
    // use getContext to use the canvas for drawing
    var ctx = canvas.getContext('2d');
    // Draw shapes
    ctx.beginPath();
    ctx.moveTo(75,25);
    ctx.quadraticCurveTo(25,25,25,62.5);
    ctx.quadraticCurveTo(25,100,50,100);
    ctx.quadraticCurveTo(50,120,30,125);
    ctx.quadraticCurveTo(60,120,65,100);
    ctx.quadraticCurveTo(125,100,125,62.5);
    ctx.quadraticCurveTo(125,25,75,25);
    ctx.stroke();
  } else {
    alert('You need Safari or Firefox 1.5+ to see this demo.');
  }
}
      </pre>
    </div>
  </body>
</html>
运行效果图如下:

22.strokeText 通过控制文字的边框后插入的文字。引用方式如下:
CanvasRenderingContext2D.strokeText(text, x, y [, maxWidth])
其中text为文字,x,y为文字开始的位置,maxWidth是这段文字的最大宽度。
例子如下:
<!DOCTYPE html> <html>
<head>
	<script type="text/javascript">
function draw()
{
  var canvas = document.getElementById("MyCanvas");
 	if (canvas.getContext) {
 	  var ctx = canvas.getContext("2d");
      ctx.font = "italic 200 36px/2 Unknown Font, sans-serif";
      ctx.strokeStyle = "blue";
      var i;
      for (i=0;i<450; i+=45){
      ctx.strokeText("Hello World",i,i);
      }
    }
}
	</script>
</head>
<body  id="MyCanvas" width="600" height="500" border="1"> </canvas>
</body>
</html>
23.clip 将当前的路径作为后面绘制操作的区域
比如调用函数fillRect 画矩形或者 arc 画了圆之后,则后面立即跟个clip函数,表示后面再有的操作都是在这个矩形或者圆内。
<html>
  <head>
    <title>A canvas clip example</title>
    <meta name="DC.creator" content="Kamiel Martinet, http://www.martinet.nl/">
    <meta name="DC.publisher" content="Mozilla Developer Center, http://developer.mozilla.org">
    <script type="application/x-javascript">
      function draw() {
        var ctx = document.getElementById('canvas').getContext('2d');
        ctx.fillRect(0,0,150,150);
        ctx.translate(75,75);
        // Create a circular clipping path
        ctx.beginPath();
        ctx.arc(0,0,60,0,Math.PI*2,true);//这里可以改为fillRect测试下,注意上面的translate就不需要了。
        ctx.clip();
        // draw background
        var lingrad = ctx.createLinearGradient(0,-75,0,75);
        lingrad.addColorStop(0, '#232256');
        lingrad.addColorStop(1, '#143778');

        ctx.fillStyle = lingrad;
        ctx.fillRect(-75,-75,150,150);
        // draw stars
        for (j=1;j<50;j++){
          ctx.save();
          ctx.fillStyle = '#fff';
          ctx.translate(75-Math.floor(Math.random()*150),75-Math.floor(Math.random()*150));
          drawStar(ctx,Math.floor(Math.random()*4)+2);
          ctx.restore();
        }

      }
      function drawStar(ctx,r){
        ctx.save();
        ctx.beginPath()
        ctx.moveTo(r,0);
        for (i=0;i<9;i++){
          ctx.rotate(Math.PI/5);
          if(i%2 == 0) {
            ctx.lineTo((r/0.525731)*0.200811,0);
          } else {
            ctx.lineTo(r,0);
          }
        }
        ctx.closePath();
        ctx.fill();
        ctx.restore();
      }
    </script>
    <style type="text/css">
      body { margin: 20px; font-family: arial,verdana,helvetica; background: #fff;}
      h1 { font-size: 140%; font-weight:normal; color: #036; border-bottom: 1px solid #ccc; }
      canvas { border: 2px solid #000; float: left; margin-right: 20px; margin-bottom: 20px; }
      pre { float:left; display:block; background=\'#\'"  border: 1px dashed #666; padding: 15px 20px; margin: 0 0 10px 0; }
    </style>
  </head>
  <body     <h1>A canvas <code>clip</code> example</h1>
    <div>
      <canvas id="canvas" width="150" height="150"></canvas>
      <pre>
function draw() {
  var ctx = document.getElementById('canvas').getContext('2d');
  ctx.fillRect(0,0,150,150);
  ctx.translate(75,75);
  // Create a circular clipping path
  ctx.beginPath();
  ctx.arc(0,0,60,0,Math.PI*2,true);
  ctx.clip();
  // draw background
  var lingrad = ctx.createLinearGradient(0,-75,0,75);
  lingrad.addColorStop(0, '#232256');
  lingrad.addColorStop(1, '#143778');

  ctx.fillStyle = lingrad;
  ctx.fillRect(-75,-75,150,150);
  // draw stars
  for (j=1;j<50;j++){
    ctx.save();
    ctx.fillStyle = '#fff';
    ctx.translate(75-Math.floor(Math.random()*150),75-Math.floor(Math.random()*150));
    drawStar(ctx,Math.floor(Math.random()*4)+2);
    ctx.restore();
  }

}
function drawStar(ctx,r){
  ctx.save();
  ctx.beginPath()
  ctx.moveTo(r,0);
  for (i=0;i<9;i++){
    ctx.rotate(Math.PI/5);
    if(i%2 == 0) {
      ctx.lineTo((r/0.525731)*0.200811,0);
    } else {
      ctx.lineTo(r,0);
    }
  }
  ctx.closePath();
  ctx.fill();
  ctx.restore();
}
      </pre>
    </div>
  </body>
</html>
24.createRadialGradient 方法创建一条放射颜色渐变效果,语法如下:
createLinearGradient(xStart, yStart, radiusStart, xEnd, yEnd, radiusEnd)
| 参数 | 描述 |
|---|---|
| xStart, yStart | 开始圆的圆心的坐标。 |
| radiusStart | 开始圆的直径。 |
| xEnd, yEnd | 结束圆的圆心的坐标。 |
| radiusEnd | 结束圆的直径。 |
例子如下:
<html>
  <head>
    <title>A canvas radialGradient example</title>
    <meta name="DC.creator" content="Kamiel Martinet, http://www.martinet.nl/">
    <meta name="DC.publisher" content="Mozilla Developer Center, http://developer.mozilla.org">
    <script type="application/x-javascript">
      function draw() {
        var ctx = document.getElementById('canvas').getContext('2d');
        // Create gradients
        var radgrad = ctx.createRadialGradient(45,45,10,52,50,30);
        radgrad.addColorStop(0, '#A7D30C');
        radgrad.addColorStop(0.9, '#019F62');
        radgrad.addColorStop(1, 'rgba(1,159,98,0)');

        var radgrad2 = ctx.createRadialGradient(105,105,20,112,120,50);
        radgrad2.addColorStop(0, '#FF5F98');
        radgrad2.addColorStop(0.75, '#FF0188');
        radgrad2.addColorStop(1, 'rgba(255,1,136,0)');
        var radgrad3 = ctx.createRadialGradient(95,15,15,102,20,40);
        radgrad3.addColorStop(0, '#00C9FF');
        radgrad3.addColorStop(0.8, '#00B5E2');
        radgrad3.addColorStop(1, 'rgba(0,201,255,0)');
        var radgrad4 = ctx.createRadialGradient(0,150,50,0,140,90);
        radgrad4.addColorStop(0, '#F4F201');
        radgrad4.addColorStop(0.8, '#E4C700');
        radgrad4.addColorStop(1, 'rgba(228,199,0,0)');

        // draw shapes
        ctx.fillStyle = radgrad4;
        ctx.fillRect(0,0,150,150);
        ctx.fillStyle = radgrad3;
        ctx.fillRect(0,0,150,150);
        ctx.fillStyle = radgrad2;
        ctx.fillRect(0,0,150,150);
        ctx.fillStyle = radgrad;
        ctx.fillRect(0,0,150,150);
      }
    </script>
    <style type="text/css">
      body { margin: 20px; font-family: arial,verdana,helvetica; background: #fff;}
      h1 { font-size: 140%; font-weight:normal; color: #036; border-bottom: 1px solid #ccc; }
      canvas { border: 2px solid #000; float: left; margin-right: 20px; margin-bottom: 20px; }
      pre { float:left; display:block; background=\'#\'"  border: 1px dashed #666; padding: 15px 20px; margin: 0 0 10px 0; }
    </style>
  </head>
  <body     <h1>A canvas <code>radialGradient</code> example</h1>
    <div>
      <canvas id="canvas" width="150" height="150"></canvas>
      <pre>
function draw() {
  var ctx = document.getElementById('canvas').getContext('2d');
  // Create gradients
  var radgrad = ctx.createRadialGradient(45,45,10,52,50,30);
  radgrad.addColorStop(0, '#A7D30C');
  radgrad.addColorStop(0.9, '#019F62');
  radgrad.addColorStop(1, 'rgba(1,159,98,0)');

  var radgrad2 = ctx.createRadialGradient(105,105,20,112,120,50);
  radgrad2.addColorStop(0, '#FF5F98');
  radgrad2.addColorStop(0.75, '#FF0188');
  radgrad2.addColorStop(1, 'rgba(255,1,136,0)');
  var radgrad3 = ctx.createRadialGradient(95,15,15,102,20,40);
  radgrad3.addColorStop(0, '#00C9FF');
  radgrad3.addColorStop(0.8, '#00B5E2');
  radgrad3.addColorStop(1, 'rgba(0,201,255,0)');
  var radgrad4 = ctx.createRadialGradient(0,150,50,0,140,90);
  radgrad4.addColorStop(0, '#F4F201');
  radgrad4.addColorStop(0.8, '#E4C700');
  radgrad4.addColorStop(1, 'rgba(228,199,0,0)');

  // draw shapes
  ctx.fillStyle = radgrad4;
  ctx.fillRect(0,0,150,150);
  ctx.fillStyle = radgrad3;
  ctx.fillRect(0,0,150,150);
  ctx.fillStyle = radgrad2;
  ctx.fillRect(0,0,150,150);
  ctx.fillStyle = radgrad;
  ctx.fillRect(0,0,150,150);
}
      </pre>
    </div>
  </body>
</html>
运行效果如下:

25.clearRect 方法删除一个画布的矩形区域,清除某区域矩形画布,并以白色作为背景填充,语法如下:
clearRect(x, y, width, height)
| 参数 | 描述 |
|---|---|
| x, y | 矩形的左上角的坐标。 |
| width, height | 矩形的尺寸。 |
例子如下:
<html>
  <head>
    <title>A canvas fillRect, strokeRect and clearRect example</title>
    <meta name="DC.creator" content="Kamiel Martinet, http://www.martinet.nl/">
    <meta name="DC.publisher" content="Mozilla Developer Center, http://developer.mozilla.org">
    <script type="text/javascript">
      function drawShape(){
        // get the canvas element using the DOM
        var canvas = document.getElementById('tutorial');
        // Make sure we don't execute when canvas isn't supported
        if (canvas.getContext){
          // use getContext to use the canvas for drawing
          var ctx = canvas.getContext('2d');
          // Draw shapes
          ctx.fillRect(25,25,100,100);
          ctx.clearRect(45,45,60,60);
          ctx.strokeRect(50,50,50,50);
        } else {
          alert('You need Safari or Firefox 1.5+ to see this demo.');
        }
      }
    </script>
    <style type="text/css">
      body { margin: 20px; font-family: arial,verdana,helvetica; background: #fff;}
      h1 { font-size: 140%; font-weight:normal; color: #036; border-bottom: 1px solid #ccc; }
      canvas { border: 2px solid #000; float: left; margin-right: 20px; margin-bottom: 20px; }
      pre { float:left; display:block; background=\'#\'"  border: 1px dashed #666; padding: 15px 20px; margin: 0 0 10px 0; }
    </style>
  </head>
  <body     <h1>An example of fillRect, clearRect and strokeRect</h1>
    <div>
      <canvas id="tutorial" width="150" height="150"></canvas>
<pre>
function drawShape(){
  // get the canvas element using the DOM
  var canvas = document.getElementById('tutorial');
  // Make sure we don't execute when canvas isn't supported
  if (canvas.getContext){
    // use getContext to use the canvas for drawing
    var ctx = canvas.getContext('2d');
    // Draw shapes
    ctx.fillRect(25,25,100,100);
    ctx.clearRect(45,45,60,60);
    ctx.strokeRect(50,50,50,50);
  }
}
</pre>
    </div>
  </body>
</html>
运行效果如下图:

26.restore 方法从栈中弹出存储的图形状态并恢复 CanvasRenderingContext2D 对象的属性、剪切路径和变换矩阵的值。
27.setLineCap 无相关资料
28.drawImage 画图,引用方式有以下三种:
drawImage(image, x, y)
drawImage(image, x, y, width, height)
drawImage(image, sourceX, sourceY, sourceWidth, sourceHeight,
          destX, destY, destWidth, destHeight)
| 参数 | 描述 |
|---|---|
| image |
所要绘制的图像。 这必须是表示 <img> 标记或者屏幕外图像的 Image 对象,或者是 Canvas 元素。 |
| x, y | 要绘制的图像的左上角的位置。 |
| width, height | 图像所应该绘制的尺寸。指定这些参数使得图像可以缩放。 |
| sourceX, sourceY | 图像将要被绘制的区域的左上角。这些整数参数用图像像素来度量。 |
| sourceWidth, sourceHeight | 图像所要绘制区域的大小,用图像像素表示。 |
| destX, destY | 所要绘制的图像区域的左上角的画布坐标。 |
| destWidth, destHeight | 图像区域所要绘制的画布大小。 |
例子如下:
<html>
  <head>
    <title>Canvas drawImage example 1</title>
    <meta name="DC.creator" content="Kamiel Martinet, http://www.martinet.nl/">
    <meta name="DC.publisher" content="Mozilla Developer Center, http://developer.mozilla.org">
    <script type="application/x-javascript">
    function draw() {
      var ctx = document.getElementById('canvas').getContext('2d');
      var img = new Image();
      img.src = 'https://developer.mozilla.org/samples/canvas-tutorial/images/backdrop.png';
      img.onload = function(){
        ctx.drawImage(img,0,0);
        ctx.beginPath();
        ctx.moveTo(30,96);
        ctx.lineTo(70,66);
        ctx.lineTo(103,76);
        ctx.lineTo(170,15);
        ctx.stroke();
      }
    }
    </script>
    <style type="text/css">
      body { margin: 20px; font-family: arial,verdana,helvetica; background: #fff;}
      h1 { font-size: 140%; font-weight:normal; color: #036; border-bottom: 1px solid #ccc; }
      h2 { font-size: 100%; color: #036; }
      canvas { float: left; margin-right: 20px; margin-bottom: 20px; }
      pre { float:left; display:block; background=\'#\'"  border: 1px dashed #666; padding: 15px 20px; margin: 0 0 10px 0; }
    </style>
  </head>
  <body     <h1>Canvas <code>drawImage</code> example 1</h1>
    <div>
      <canvas id="canvas" width="180" height="130"></canvas>
      <pre>
function draw() {
  var ctx = document.getElementById('canvas').getContext('2d');
  var img = new Image();
  img.src = 'https://developer.mozilla.org/samples/canvas-tutorial/images/backdrop.png';
  img.onload = function(){
    ctx.drawImage(img,0,0);
    ctx.beginPath();
    ctx.moveTo(30,96);
    ctx.lineTo(70,66);
    ctx.lineTo(103,76);
    ctx.lineTo(170,15);
    ctx.stroke();
  }
}
      </pre>
      <div style="float:left;">
        <h2>Source image</h2>
        <img src="images/backdrop.png"/>
      </div>
    </div>
  </body>
</html>
来源:http://2629783.blog.51cto.com/2619783/495283
加支付宝好友偷能量挖...